

Create a SIP trunk
1
Choose a PBX
When creating the trunk, select a PBX type. The choice mainly affects the UI and some peripheral integrations, not core SIP behavior.
2
Choose a region
Set the trunk region to match the hostname you will use when sending SIP to Vatel, or when pointing your PBX at Vatel. See Region for the available edges and how this field behaves.
3
Configure inbound authentication
Set the inbound authentication strategy and provide the required parameters:
4
Configure outbound credentials
Choose whether outbound SIP INVITEs (and transfers) use credentials:
The same outbound config is used for outbound calls and transfers.
5
Add agent assignments
Assign one or more agents to the trunk. Each agent assignment links an agent to the trunk and exposes SIP URIs reachable for that agent.
Use these URIs in your PBX or carrier as the destination for calls you want handled by each agent.
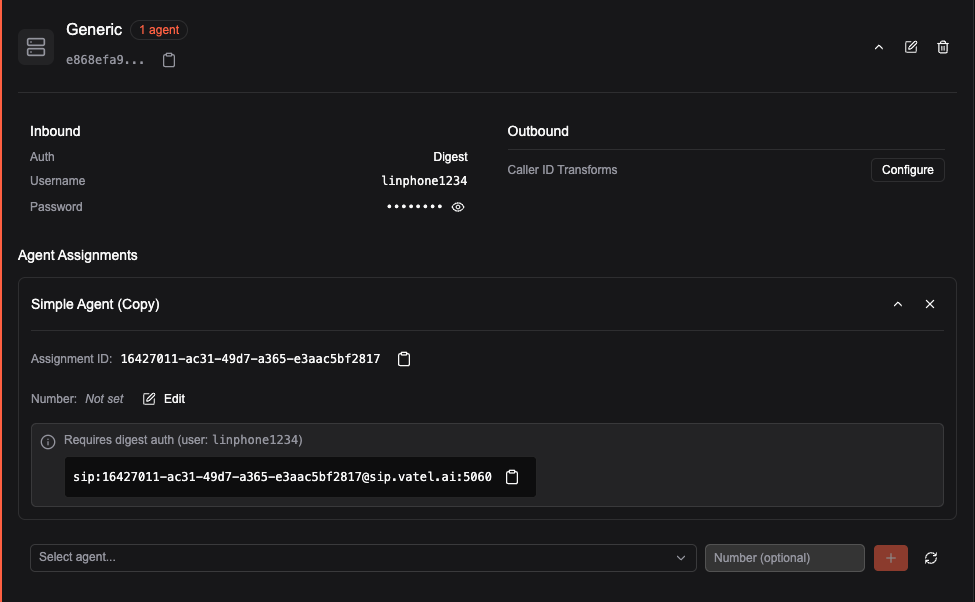
Alternative number per assignment. For every assignment you can configure an alternative number. By default the SIP URI user part is the assignment ID (for example sip:(ID)@us-central1.sip.vatel.ai). If you set an alternative number, that value is used as the user part instead (for example sip:5551234@us-central1.sip.vatel.ai). This can help when your PBX expects a specific number or format in the SIP URI. Use the hostname that matches the trunk region.
Region
The region on a SIP trunk is the Vatel telephony region that should own that trunk’s SIP edge. Set it to match the hostname you actually use for this trunk.sip.vatel.ai is not a third region. It is a convenience name that follows US Central unless Vatel fails over during a regional outage. If you point your PBX at sip.vatel.ai, set the trunk region to us-central1.
Selecting a region is not only a label. The first concrete behavior is outbound SIP REGISTER: registration originates from the region you selected, so only that region registers the trunk. Inbound call routing is not fully region-locked by this field yet. Still match region to the hostname you use so outbound registration and later routing stay aligned.
Existing trunks that have no explicit region default to us-central1, which matches sip.vatel.ai and us-central1.sip.vatel.ai. If those trunks send SIP to northamerica-northeast1.sip.vatel.ai, update the region to Canada Northeast.